贡献
¥Contributing
感谢您有兴趣为 HTTPX 做出贡献。您可以通过多种方式为该项目做出贡献:
¥Thank you for being interested in contributing to HTTPX. There are many ways you can contribute to the project:
尝试 HTTPX 和报告您发现的错误/问题
¥Try HTTPX and report bugs/issues you find
编写文档
¥Write documentation
参与讨论
¥Participate in discussions
报告错误或其他问题
¥Reporting Bugs or Other Issues
发现了 HTTPX 应该支持的功能?偶然发现了一些意料之外的行为?
¥Found something that HTTPX should support? Stumbled upon some unexpected behaviour?
贡献通常应该从讨论可能存在的 bug 可以作为“潜在问题”讨论提出,功能请求可以作为“想法”讨论提出。之后,我们可以决定是否需要将讨论升级为“问题”,或者是否考虑提交拉取请求。
¥Contributions should generally start out with a discussion. Possible bugs may be raised as a "Potential Issue" discussion, feature requests may be raised as an "Ideas" discussion. We can then determine if the discussion needs to be escalated into an "Issue" or not, or if we'd consider a pull request.
尝试尽可能详细地描述,并在报告错误时提供尽可能多的信息,例如:
¥Try to be more descriptive as you can and in case of a bug report, provide as much information as possible like:
操作系统平台
¥OS platform
Python 版本
¥Python version
已安装的依赖项和版本(
python -m pip freeze)¥Installed dependencies and versions (
python -m pip freeze)代码片段
¥Code snippet
错误追溯
¥Error traceback
你应该总是尝试将任何例子简化为最简单的情况这证明了这个问题。
¥You should always try to reduce any examples to the simplest possible case that demonstrates the issue.
一些可能有用的提示有助于缩小潜在问题的范围......
¥Some possibly useful tips for narrowing down potential issues...
该问题是否存在于 HTTP/1.1、HTTP/2 或两者上?
¥Does the issue exist on HTTP/1.1, or HTTP/2, or both?
是否存在以下问题
Client,AsyncClient,还是两者兼而有之?¥Does the issue exist with
Client,AsyncClient, or both?使用时
AsyncClient使用时是否存在此问题asyncio或者trio,还是两者兼而有之?¥When using
AsyncClientdoes the issue exist when usingasyncioortrio, or both?
发展
¥Development
要开始开发 HTTPX,请创建一个叉的HTTPX 存储库在 GitHub 上。
¥To start developing HTTPX create a fork of the HTTPX repository on GitHub.
然后使用以下命令克隆你的 fork,替换YOUR-USERNAME使用您的 GitHub 用户名:
¥Then clone your fork with the following command replacing YOUR-USERNAME with
your GitHub username:
$ git clone https://github.com/YOUR-USERNAME/httpx
您现在可以使用以下方式安装项目及其依赖项:
¥You can now install the project and its dependencies using:
$ cd httpx
$ scripts/install
测试和 Linting
¥Testing and Linting
我们使用自定义 shell 脚本来自动化测试、linting 和文档构建工作流程。
¥We use custom shell scripts to automate testing, linting, and documentation building workflow.
要运行测试,请使用:
¥To run the tests, use:
$ scripts/test
警告
¥Warning
测试套件在端口上生成测试服务器8000和8001。确保这些未被使用,以便测试可以正常运行。
¥The test suite spawns testing servers on ports 8000 and 8001. Make sure these are not in use, so the tests can run properly.
任何附加参数都将传递给pytest。请参阅pytest 文档了解更多信息。
¥Any additional arguments will be passed to pytest. See the pytest documentation for more information.
例如,运行单个测试脚本:
¥For example, to run a single test script:
$ scripts/test tests/test_multipart.py
要运行代码自动格式化:
¥To run the code auto-formatting:
$ scripts/lint
最后,单独运行代码检查(它们也作为scripts/test), 跑步:
¥Lastly, to run code checks separately (they are also run as part of scripts/test), run:
$ scripts/check
记录
¥Documenting
文档页面位于docs/文件夹。
¥Documentation pages are located under the docs/ folder.
要在本地运行文档站点(有助于预览更改),请使用:
¥To run the documentation site locally (useful for previewing changes), use:
$ scripts/docs
解决构建/CI 失败
¥Resolving Build / CI Failures
提交拉取请求后,测试套件将自动运行,结果将显示在 GitHub 中。如果测试套件失败,您需要点击“详细信息”链接,并尝试找出测试套件失败的原因。
¥Once you've submitted your pull request, the test suite will automatically run, and the results will show up in GitHub. If the test suite fails, you'll want to click through to the "Details" link, and try to identify why the test suite failed.
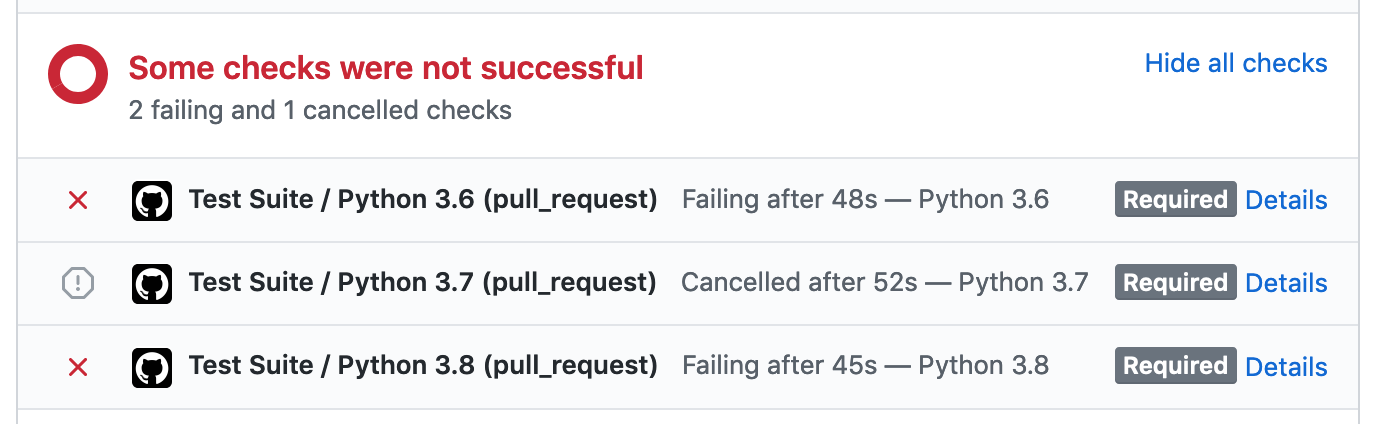
以下是测试套件可能失败的一些常见原因:
¥Here are some common ways the test suite can fail:
检查作业失败
¥Check Job Failed
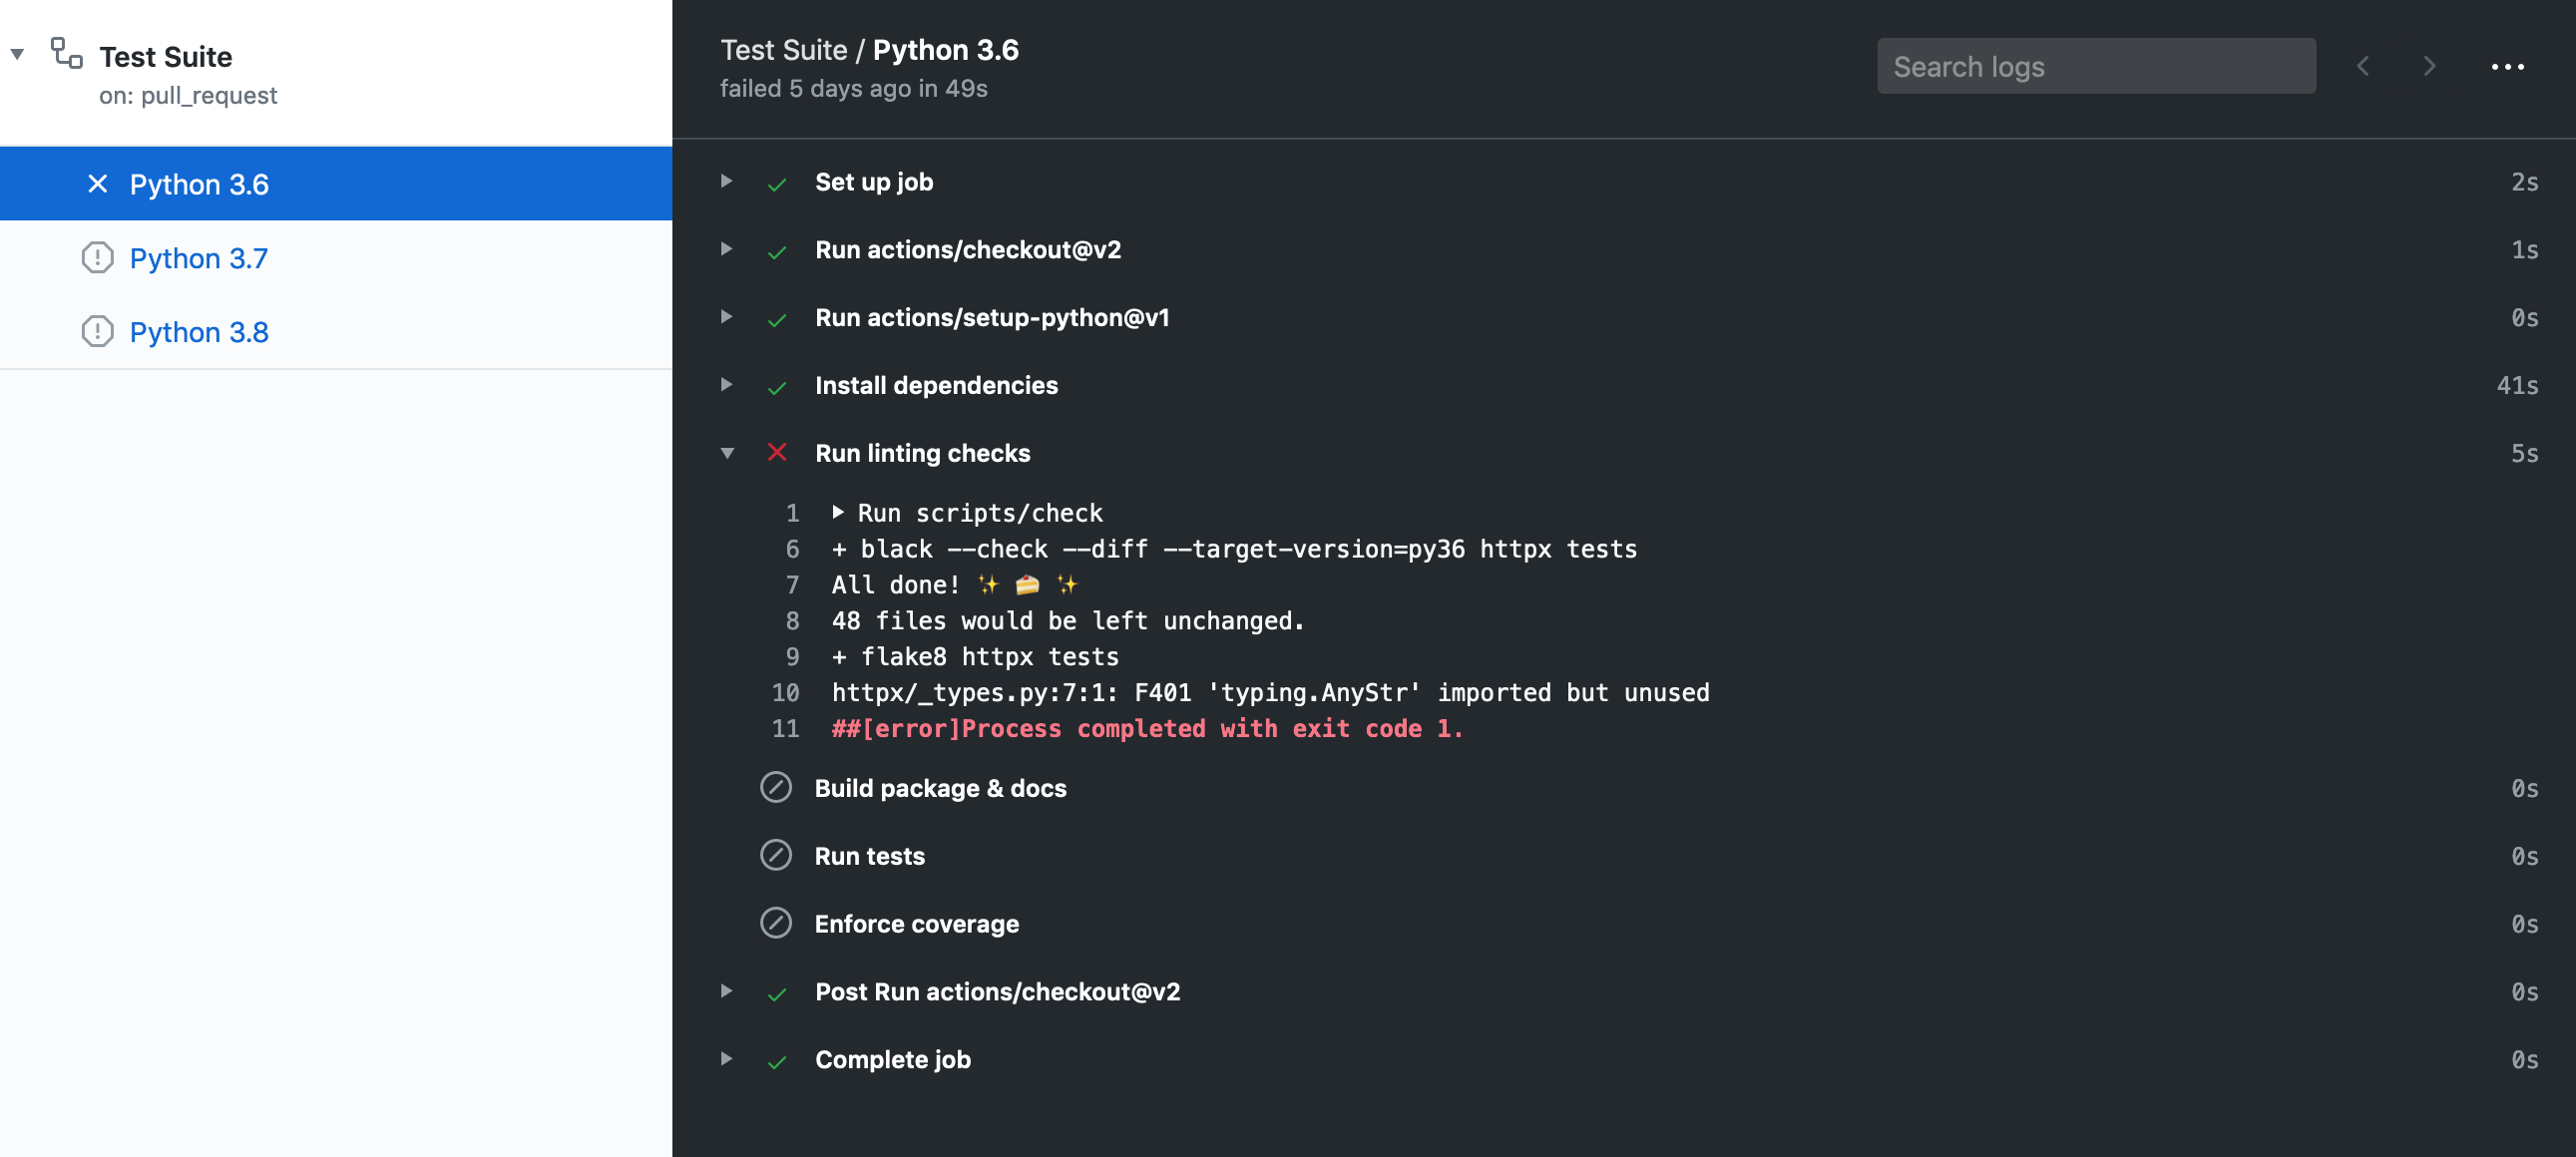
此作业失败意味着存在代码格式问题或类型注释问题。您可以查看作业输出来找出失败的原因,或者在 shell 中运行以下命令:
¥This job failing means there is either a code formatting issue or type-annotation issue. You can look at the job output to figure out why it's failed or within a shell run:
$ scripts/check
也许值得一跑$ scripts/lint尝试自动格式化代码,如果该作业成功,则提交更改。
¥It may be worth it to run $ scripts/lint to attempt auto-formatting the code
and if that job succeeds commit the changes.
文档作业失败
¥Docs Job Failed
此作业失败意味着文档构建失败。发生这种情况的原因有很多,例如 Markdown 无效或缺少配置mkdocs.yml。
¥This job failing means the documentation failed to build. This can happen for
a variety of reasons like invalid markdown or missing configuration within mkdocs.yml.
Python 3.X 作业失败
¥Python 3.X Job Failed
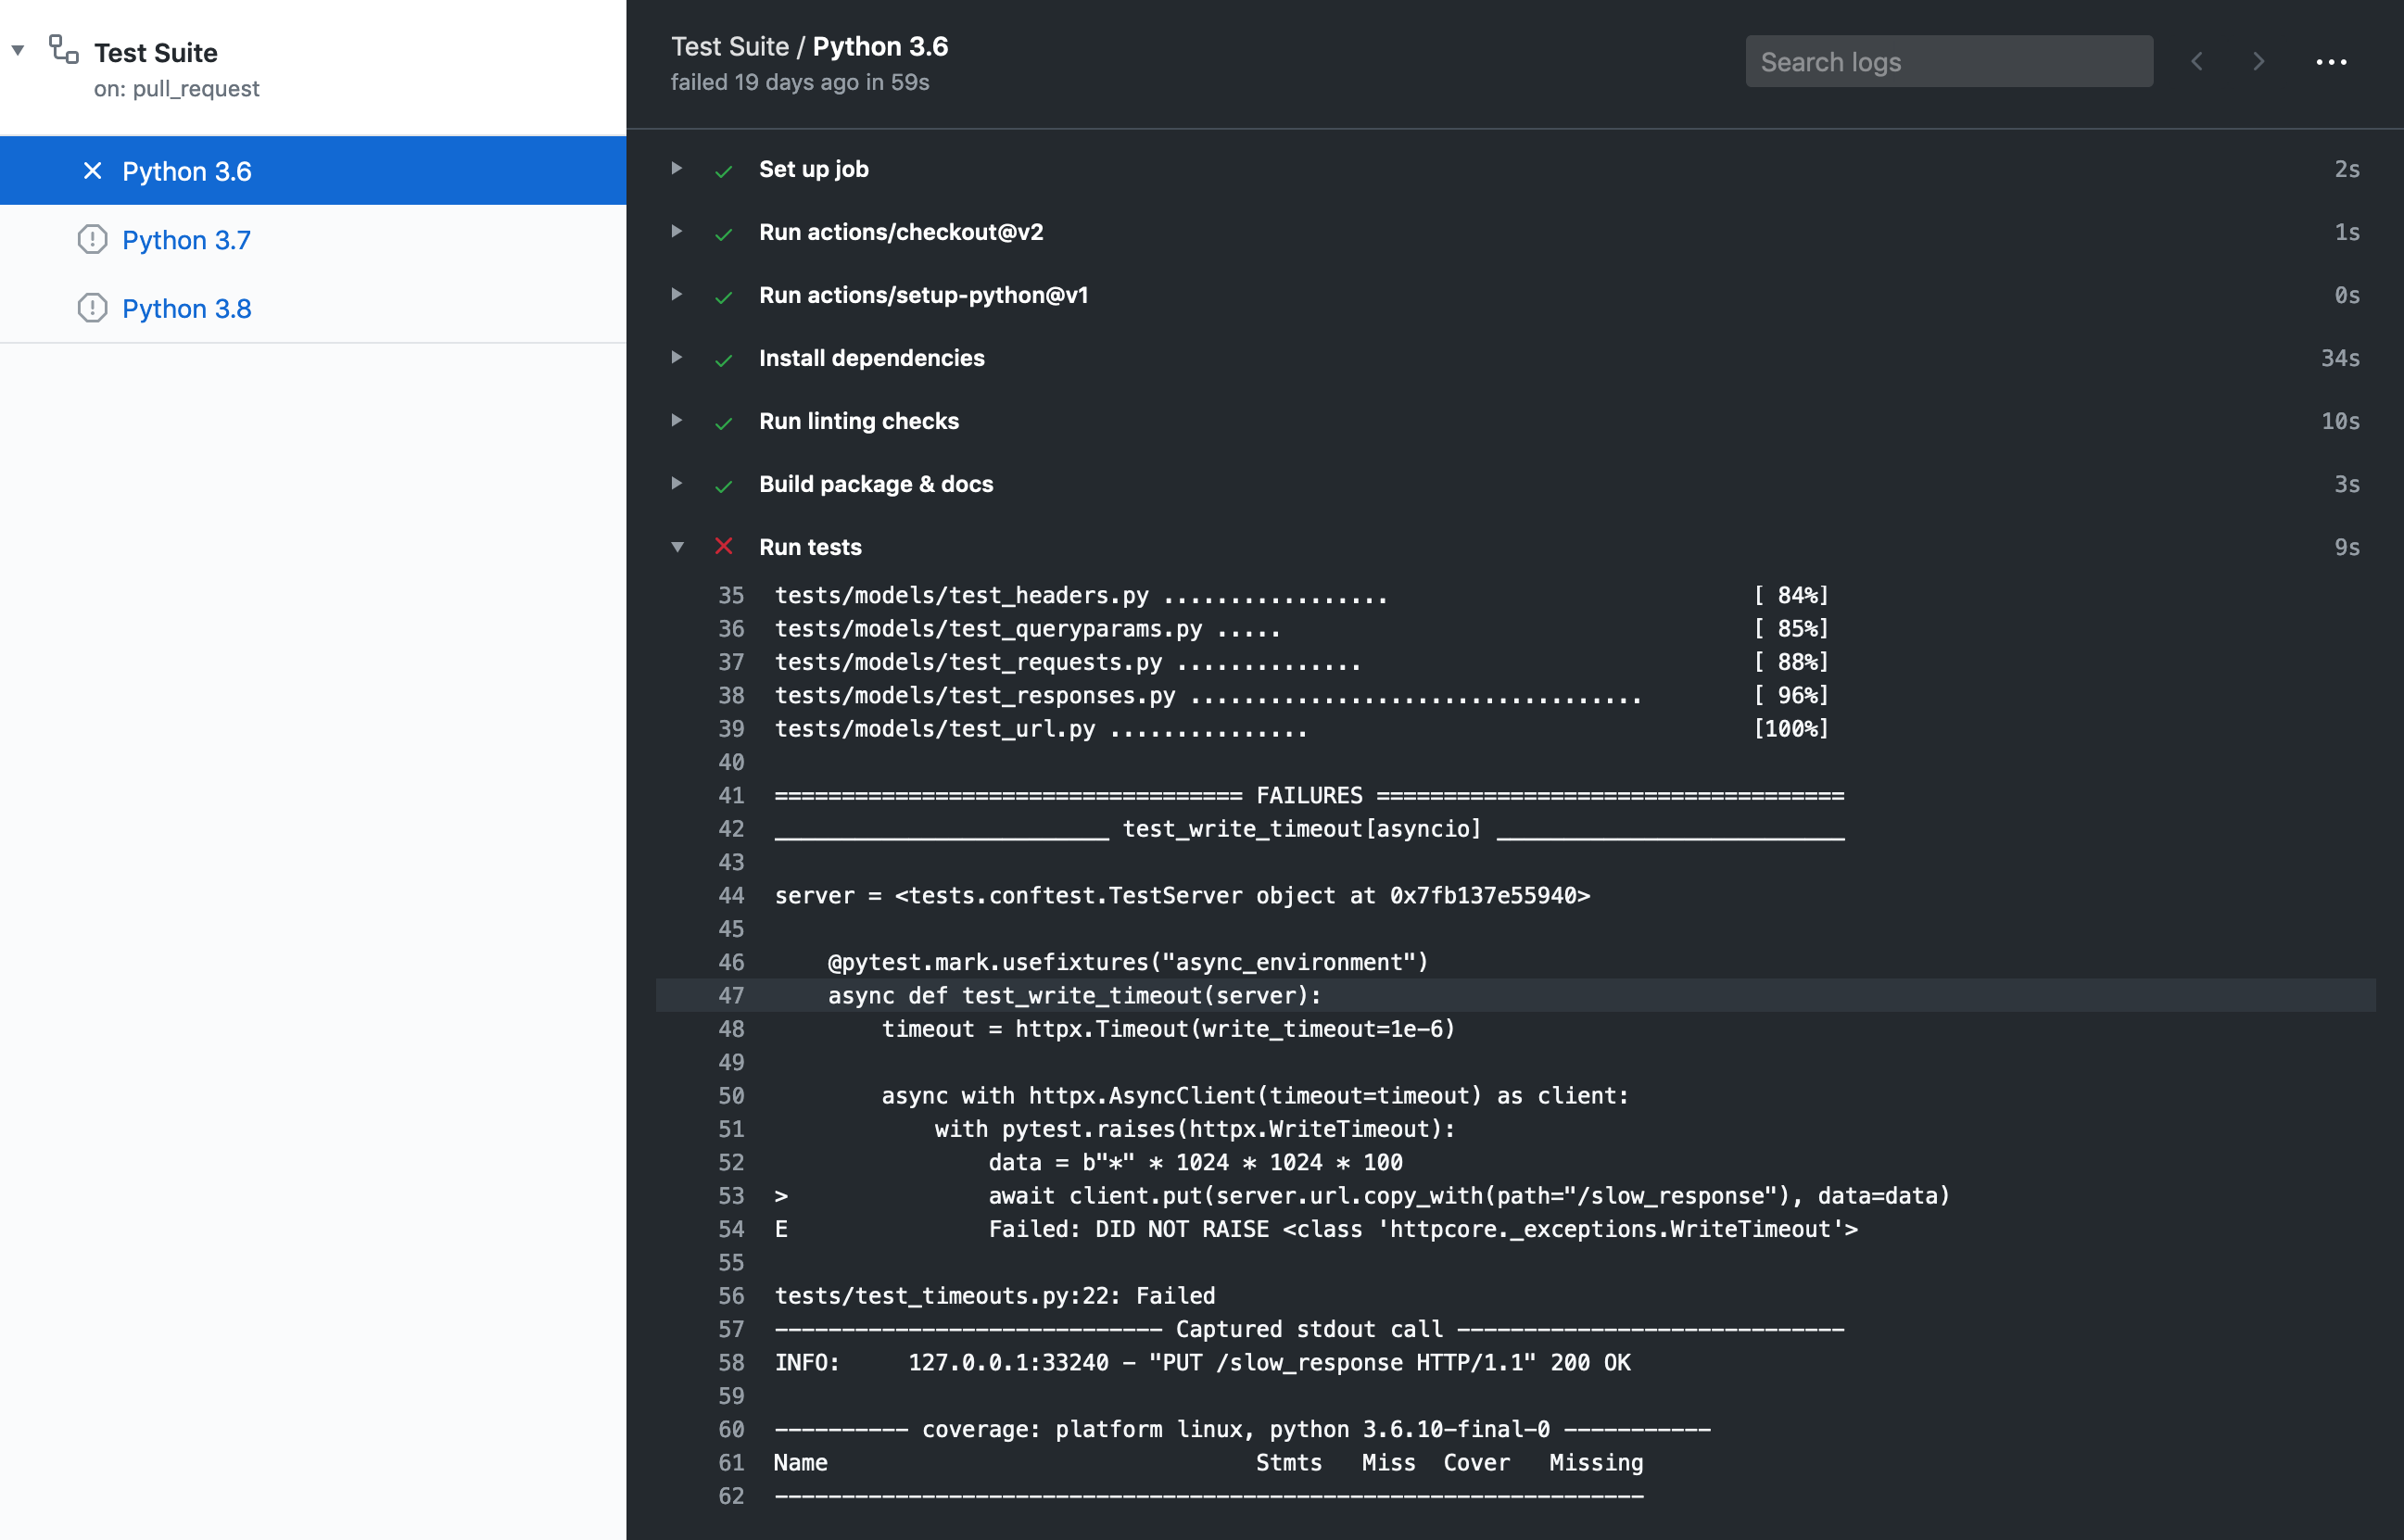
此项作业失败意味着单元测试失败或单元测试并未覆盖所有代码路径。
¥This job failing means the unit tests failed or not all code paths are covered by unit tests.
如果测试失败,您将在覆盖率报告下看到此消息:
¥If tests are failing you will see this message under the coverage report:
=== 1 failed, 435 passed, 1 skipped, 1 xfailed in 11.09s ===
¥=== 1 failed, 435 passed, 1 skipped, 1 xfailed in 11.09s ===
如果测试成功但覆盖率未达到我们当前的阈值,您将在覆盖率报告下看到此消息:
¥If tests succeed but coverage doesn't reach our current threshold, you will see this message under the coverage report:
FAIL Required test coverage of 100% not reached. Total coverage: 99.00%
¥FAIL Required test coverage of 100% not reached. Total coverage: 99.00%
释放
¥Releasing
本节针对的是 HTTPX 维护者。
¥This section is targeted at HTTPX maintainers.
在发布新版本之前,请创建一个拉取请求,其中包含:
¥Before releasing a new version, create a pull request that includes:
更新日志:
¥An update to the changelog:
我们遵循以下格式keepachangelog。
¥We follow the format from keepachangelog.
比较
master带有最新版本的标签,并列出我们用户感兴趣的所有条目:¥Compare
masterwith the tag of the latest release, and list all entries that are of interest to our users:那些事情必须进入变更日志:添加、更改、弃用或删除的功能以及错误修复。
¥Things that must go in the changelog: added, changed, deprecated or removed features, and bug fixes.
那些事情不应该进入变更日志:对文档、测试或工具的更改。
¥Things that should not go in the changelog: changes to documentation, tests or tooling.
尝试按影响度/重要性的降序对条目进行排序。
¥Try sorting entries in descending order of impact / importance.
保持简洁并切中要点。🎯
¥Keep it concise and to-the-point. 🎯
版本升级: 看
__version__.py。¥A version bump: see
__version__.py.
例如,请参阅#1006。
¥For an example, see #1006.
一旦发布 PR 合并,创建一个新版本包括:
¥Once the release PR is merged, create a new release including:
标签版本类似
0.13.3。¥Tag version like
0.13.3.发行标题
Version 0.13.3¥Release title
Version 0.13.3从变更日志复制的描述。
¥Description copied from the changelog.
一旦创建,此版本将自动上传到 PyPI。
¥Once created this release will be automatically uploaded to PyPI.
如果 PyPI 工作出现问题,可以使用scripts/publish脚本。
¥If something goes wrong with the PyPI job the release can be published using the
scripts/publish script.
开发代理设置
¥Development proxy setup
要通过代理测试和调试请求,最好在本地运行代理服务器。任何服务器都可以,但 HTTPCore 的测试套件使用mitmproxy它是用 Python 编写的,功能齐全,具有出色的 UI 和用于检查请求的工具。
¥To test and debug requests via a proxy it's best to run a proxy server locally.
Any server should do but HTTPCore's test suite uses
mitmproxy which is written in Python, it's fully
featured and has excellent UI and tools for introspection of requests.
您可以安装mitmproxy使用pip install mitmproxy或者其他几种方法。
¥You can install mitmproxy using pip install mitmproxy or several
other ways.
mitmproxy确实需要为 HTTPS 请求设置本地 TLS 证书,因为它的主要目的是允许开发人员检查通过它的请求。我们可以按照以下步骤进行设置:
¥mitmproxy does require setting up local TLS certificates for HTTPS requests,
as its main purpose is to allow developers to inspect requests that pass through
it. We can set them up follows:
trustme-cli -i example.org www.example.org,假设您想要测试连接到该域,这将创建三个文件:server.pem,server.key和client.pem。¥
trustme-cli -i example.org www.example.org, assuming you want to test connecting to that domain, this will create three files:server.pem,server.keyandclient.pem.mitmproxy需要一个包含私钥和证书的 PEM 文件,因此我们需要将它们连接起来:cat server.key server.pem > server.withkey.pem。¥
mitmproxyrequires a PEM file that includes the private key and the certificate so we need to concatenate them:cat server.key server.pem > server.withkey.pem.启动代理服务器
mitmproxy --certs server.withkey.pem或使用其他 mitmproxy 命令具有不同的 UI 选项。¥Start the proxy server
mitmproxy --certs server.withkey.pem, or use the other mitmproxy commands with different UI options.
此时服务器已准备好开始处理请求,您需要按照代理部分和SSL 证书部分,这是我们之前生成的client.pem有以下版本:
¥At this point the server is ready to start serving requests, you'll need to
configure HTTPX as described in the
proxy section and
the SSL certificates section,
this is where our previously generated client.pem comes in:
ctx = ssl.create_default_context(cafile="/path/to/client.pem")
client = httpx.Client(proxy="http://127.0.0.1:8080/", verify=ctx)
但请注意,HTTPS 请求只会成功到达我们生成的 SSL/TLS 证书中指定的主机,对其他主机的 HTTPS 请求将引发如下错误:
¥Note, however, that HTTPS requests will only succeed to the host specified in the SSL/TLS certificate we generated, HTTPS requests to other hosts will raise an error like:
ssl.SSLCertVerificationError: [SSL: CERTIFICATE_VERIFY_FAILED] certificate
verify failed: Hostname mismatch, certificate is not valid for
'duckduckgo.com'. (_ssl.c:1108)
如果您想向更多主机发出请求,则需要重新生成证书并在第二步中包含您打算连接的所有主机,即
¥If you want to make requests to more hosts you'll need to regenerate the certificates and include all the hosts you intend to connect to in the seconds step, i.e.
trustme-cli -i example.org www.example.org duckduckgo.com www.duckduckgo.com
¥trustme-cli -i example.org www.example.org duckduckgo.com www.duckduckgo.com